Affiliate Disclosure: As an Amazon Associate I earn from qualifying purchases.
Setting up port forwarding allows you to make a device on your home network available to others on the Internet despite sitting behind a router’s firewall. It involves assigning a static IP address to your target device and setting up a dynamic DNS server for your public IP address. This article will guide you through the entire process.
What Is Port Forwarding?
Port forwarding provides a way of making a device on your home network accessible to others on the Internet, despite your device sitting behind the security of a router.
There are a few common uses for setting up port forwarding including peer to peer downloading, voice over IP applications and hosting game servers.
This is not a complete list of uses; there are many other reasons as to why you may need to forward a port.
What Are Ports?
Ports can be thought of as virtual roads on which information must travel over the Internet, with there being 65,536 of them in total.
Port numbers combined with your public IP address provide the “who does what” information which is kept by every ISP (Internet Service Provider).
What Are the Commonly Used Ports?
Every program on your device that is configured to use the Internet in one form or another will be programmed to send its packets through specific ports.
Most of the time, programmers will use one of the more standard ports depending on what the program is designed to do, but sometimes the ports will be selected arbitrarily.
Here are a few of the industry-standard uses for common ports:
- HTML pages – Port 80
- POP3 email – Port 110
- FTP file transfers – Port 21
- Domain Name System (DNS) – Port 53
- Telnet – Port 23
How Your Router Uses Ports
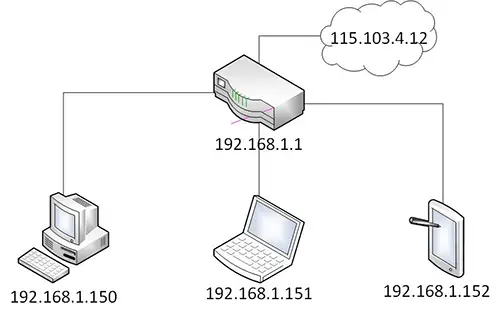
Here is a map of a very basic, example home network setup.
The cloud symbolizes the Internet, with the IP address below it representing your public IP address (also known as forward-facing). This is the IP address that represents your entire home network to the outside world.
We also have your router which is represented by the IP address 192.168.1.1 and a host of other devices that have been assigned an IP address by the router’s DHCP service.
Think of it this way.
Your public IP address represents a street address, whereas the internal IP addresses represent apartment numbers within that street address.
NAT
If this is the case, how does the information from the Internet end up on your device and not another family member’s when the public IP address is the same across all devices?
The Internet traffic ends up reaching the intended device thanks to what is known as Network Address Translation (NAT).
This process takes place at the router level and acts almost like a traffic warden.
NAT will direct the flow of network traffic through the router, allowing a single public IP address to be shared amongst all devices that sit behind your router.
Thanks to NAT being in place, everyone on your home network can request to visit websites as well as over Internet-based content at the same time, with it all being delivered to the correct device.
Ports
So what about the ports themselves? Where do they fit into this process?
Despite being an old technology, ports are still widely used. Previously, when computers were not as advanced as they are today and were only capable of running one application at a time, you simply had to point one computer at another on the network to connect the two as they would be using the same application.
Roll on several years and computers became more proficient and could run multiple applications. Programmers had to overcome this issue and ensure that programs connected to the right applications, which is where ports began to be used.
As we discussed earlier, some ports are used for specific applications, with an example being port 80 when you visit a web page.
Your operating system will know that port 80 is for HTTP traffic, so will listen on that port and respond accordingly.
If you were to configure a different port for HTTP traffic, the webserver at the other end won’t recognize it as it will only be listening on port 80.
As there are literally tens of thousands of ports available, some will not have pre-assigned uses, so you can use them as you see fit.
Standard ports will typically be lower in number, so if you are setting up your own port forwarding rules it is best to use a higher number,
The popular Plex Media Server uses port 32400 and Minecraft servers use port 25565, as just a couple of examples.
Each port can be used via TCP (Transmission Control Protocol) or UDP (User Datagram Protocol).
TCP is more commonly used in home network environments, but UDP is used for BitTorrent.
It does depend on what exactly is listening, but either way, a port will be expecting requests to be made using one of these two protocols.
Why Would You Need to Forward Ports?
Ports are used primarily to help your router connect different services and applications where NAT is not used to set their own ports and take care of all the configuration for you.
You would be surprised how many applications fall into this camp and require you to sort out the ports yourself.
Let’s use an example of you working on a laptop remotely and wanting to be able to connect to your home network to access some files.
Your laptop has been assigned IP address 215.202.9.50 and the public IP address of your home network is 115.103.4.12.
Assuming your router doesn’t have the advanced NAT features we discussed earlier, when you try and connect to 115.103.4.12 through a remote desktop application or FTP client, nothing will happen.
Your request will fall into the ether as it won’t know where to send it.
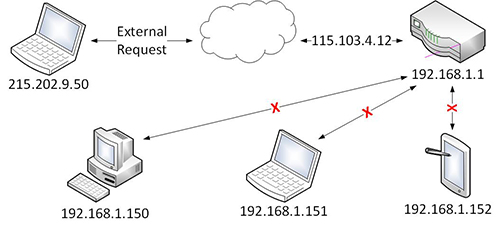
This may sound all doom and gloom but think of it this way.
Would you want somebody to be able to connect to your home network if they knew what your public IP address was?
Of course not. You would actually want the request to be rejected.
This is what makes a great security feature; the firewall in your router is rejecting the connection which helps prevent unauthorized access to your home network.
If you are the one making the request, however, you don’t want your router to reject you and prevent your access. There is where we need to do some tinkering with the ports.
You need to be able to tell your router that when you want to access it with a particular program, it needs to send the request to a particular device on a particular port.
This sounds complicated, but with these instructions for your router in place, it will know to give you access to the right device and application on your home network.
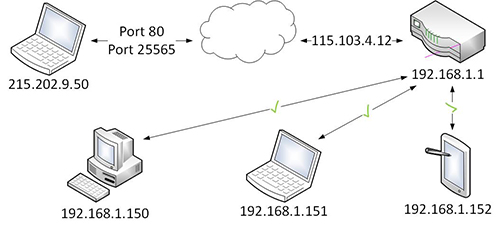
With the port forwarding rules in rule, you can use different ports to make your requests.
This is not the only benefit of setting up port forwarding.
You can also use it to change the port numbers of existing services for your own convenience.
As an example, let’s say you have two web servers running on your home network running two different projects. One you want publicly available, yet the other needs to remain private.
When accessing your home network on the public-facing port 80, you can instruct your router to send your request to port 80 on the web server hosting your public project.
You can also tell your router that when you access it using port 1500, for example, your request should go to port 80 on the other web server hosting your private project.
Using this, you don’t need to worry about configuring the second webserver to use a different port to the standard port 80, but you can still manage the direction in which a request will take.
Keeping the public project on the standard port 80 also makes it easier for those you are sharing the project with to access it.
So there was an overview of port forwarding and where you might want to use it.
Before we move on to how to set up port forwarding, there are a few tasks to complete first to make setting up the port forwarding rules themselves less of a headache.
What to Do Before Setting up Port Forwarding
Before attempting to set up port forwarding on your router, running through the checks below in advance will make the setup go much smoother.
1. Set Static IP Addresses
If your devices are being assigned dynamic IP addresses by your router’s DHCP service, any port forwarding rules you setup will be useless.
I got into more detail about DHCP in this article but here is a quick summary to bring you up to speed.
Your router has a pool of IP addresses that it keeps reserved to assign to devices as and when they join and leave your home network.
When a device connects to your home network, the router will dynamically assign it one of the IP addresses that are available in the DHCP pool.
When the device has been disconnected for a period of time or the router gets rebooted, that particular IP address will be put back into the pool and become available to assign again.
For most people, there is absolutely no problem with this. At the end of the day, it doesn’t matter which IP address your device gets as long as it does get one.
For port forwarding rules, however, it is essential that the application, device or service keeps the same IP address that is specified in the rule. If it changes, the criteria of the rule will not be met and simply fail.
This is where assigning a static IP address comes into play. A static address must be set on each network device you are assigning a port forwarding rule to.
Going through and setting up port forwarding rules to only find they fail when the IP address of a device changes is one of the reasons you should set static IP addresses before doing anything else.
2. Know Your IP Address
Once you have set up static IP addresses on the devices you want to point port forwarding rules to, you need to know what your public IP address is.
This is easily achieved by going to whatismyipaddress.com whilst connected to your home network.
Chances are, you will keep the same public IP address for a considerable amount of time, and I’m talking months or even years, but that’s not to say it can’t change.
This is assuming that your ISP has not explicitly given you a static public-facing IP address, but this service does often come with an additional charge if even offered at all.
You, therefore, can’t rely on the address remaining the same, but you also don’t want the hassle of having to check what your public IP address is before you leave your home network and intend to connect to it remotely.
To get around having to do this each time, you can set up a dynamic DNS service that allows you to link your public IP address to a more memorable address, despite the IP address potentially changing.
This way you only have to remember the address (thehomenetworkgeekserver.dynu.net) for example and not have to check your public IP address each time.
3. Check Local Firewalls
Even when you have set up a static IP address, ensured you are using the correct and up-to-date public IP address and set up the port forwarding rules themselves, there is a chance you’ll find they still don’t work.
There is where you may need to check the firewall rules on your device.
If the device you are connecting to remotely is running any local firewall or an anti-virus tool that includes firewall protection, you will need to set up an exception to allow the remote connection.
You would be surprised at how many people are able to setup port forwarding rules successfully, but forget about the firewall request.
How to Setup Port Forwarding
Now you know what port forwarding is and how it works, it’s time to get into the nuts and bolts and actually set it up.
Don’t worry, it is a pretty straight forward process.
Before we begin, do remember that every router is different. Every manufacturer of routers will have their own software, and even how that software looks can vary between models by the same manufacturer.
For this tutorial, I’ll be using my own router but this will still hopefully give you an idea of what you should be looking for in your own router. If you get stuck, you can always consult your router’s manual or help online.
Right, let’s get started.
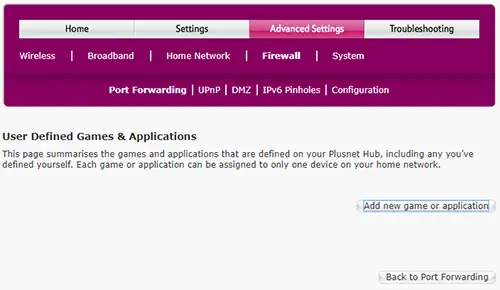
1. Find the Port Forwarding Rules
The first step is to log in to your router and look for a menu labeled as “port forwarding”, or something similar.
This menu can be hidden sometimes, so you may need to hunt around for it.
Here is the port forwarding menu on my router:

How complex the interface looks will vary between routers, with some being more complicated than others.
Now that you have located the port forwarding menu, it’s time to set up your first rule.
2. Set up a Port Forwarding Rule
After discussing all of the work that goes into port forwarding earlier in this article, you may be dreading this next step, but in reality, setting up a port forwarding rule is actually very straight forward.
Within the port forwarding menu, select the option to add a new game or application.
You may have the option to copy an existing game or application here, but as you have yet to set any up, select No and give your game, application or service a name.
I would suggest simply giving it the name of the game, application or service so you can easily find it later. For this tutorial, I’m going to set up a Minecraft server and send the traffic to my PC, so I will name mine “Minecraft”.

The next step is to select the protocol that the rule should use. As we discussed earlier, either TCP, UDP, or “any” needs to be selected here. I’m going to choose “any” for the sake of time.
Remember every router is different, so this next step may be different for you, but on my router, I need to specify a “port range” and “translate to”. As I’m setting up a Minecraft server, I’m going to simply enter the port Minecraft uses (25565) in each of these fields, and then click on Add and Apply.
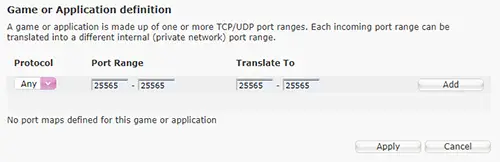
Notice I don’t get the option to specify which device to forward the traffic to, so I need to go back to the initial port forwarding menu.
From there, I should find the new game or application I just created within the list. After selecting Minecraft, I can choose my PC from the device list and click on Add.
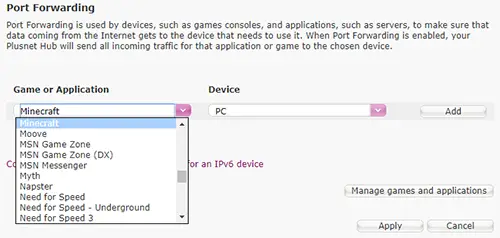
If you notice a save or apply button, make sure to click it to ensure your rule is saved.
Your port forwarding rule is now in place, so it’s time to test it.
3. Test Your Port Forwarding Rule
Now you can, of course, test your port forwarding rule by carrying out the intended task, so using my example I could ask a friend to connect their Minecraft server to my PC, but this doesn’t offer a quick way of testing the rule, especially if you are currently connected to your home network.
This is where I would suggest using a handy utility over at YouGetSignal.com which checks port availability. We can test our port forwarding rule by having the utility try and connect to it.
All you need to do is enter your public IP address and the port number you specified when creating the rule and click on Check.
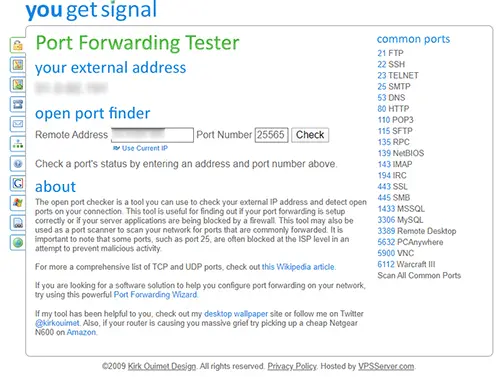
If successful, you should receive a message confirming that the port is open on your IP address. Should the test fail, double-check that you entered the correct IP address and that the port number in the tester matches that within the rule.
Also, remember to check if a local firewall is in place on your device.
Conclusion
Port forwarding does sound complicated, but once you get to grips with it, it really is quite simple.
Setting up port forwarding rules can seem like a hassle, but once you have assigned a static IP address to your target device and set up a dynamic DNS server for your public IP address, creating the rules themselves is actually a very quick and straightforward process.
