If you want a consistent and reliable way of being able to access your home network from anywhere in the world, you need to have dynamic DNS in place.
Dynamic DNS provides an easy way of giving your home network a memorable and user-friendly address that can be accessed over the Internet.
What is DNS?
Before getting into the meat and potatoes of what dynamic DNS is and how to set it up, let’s first talk briefly after DNS.
DNS (Domain Name System) essentially makes the Internet user-friendly by translating an IP address into a more memorable address.
Every resource available on the Internet, be it an FTP site or a simple web page, will have an IP address. This is known as the resource’s network address.
These addresses are numeric, using a format a 222.222.222.222.
As you can see, there are four parts to an IP address which we refer to as octets. Each octet consists of 8 bits, so an IP address is made up of a total of 32 bits.
Every IP address is also divided into two sections; one to define your network and the other to define your device.
IP addresses are not particularly easy to remember.
When was the last time you visited 34.89.23.144 to get tons of useful information on home networking?
I’m guessing never.
You will have instead typed https://homenetworkgeek.com into your web browser as it is much easier to remember and more user-friendly.
You can thank DNS for that.
DNS was able to resolve the address you entered into your browser to the more machine-friendly IP address and take you to that Internet resource extraordinarily quickly, often in less than a second.
You may also like: Port Forwarding: What It Is and How to Set It Up
What is Dynamic DNS?
DNS is great for use out on the Internet, but what about if you wanted to replicate it within your home network?
This is where dynamic DNS is used.
Large companies can quickly and easily set up domain names because the IP address of their web server hosting the site is static. This means that once it is set, it doesn’t change.
Unfortunately, our IP addresses at home don’t work in the same way and can change quite frequently.
We get our IP address assigned to us dynamically from a large pool of IP addresses that the ISP (Internet Service Providers) manages. They assign an IP address from this pool to their customers as and when it is needed.
So what is the impact of this on us?
It makes it pretty difficult for us to replicate what these larger companies are doing as the IP address you configure one week may well change completely by the time the next week rolls around.
Dynamic DNS provides an easy way of assigning a memorable name to your home network’s IP address with it updating automatically as your IP address changes over time.
Once dynamic DNS is set up, anytime you or your friends want to connect to resources on your home network, you can simply enter the memorable name (homenetworkgeek.ddns.net for example) instead of having to look up your IP address each time, just in case it has changed.
Why Would You Want to Use Dynamic DNS?
So why would you want to use dynamic DNS? What are the benefits?
Using dynamic DNS comes with a host of benefits, including being able to host a website from home, accessibility to files regardless of where you are in the world, and remotely connecting to your computer when you are away.
This is certainly not an exhaustive list of the benefits of implementing dynamic DNS, but just a few examples of the more common uses.

How Does Dynamic DNS Work?
Dynamic DNS works by making use of a feature of DNS known as Time-To-Live (TTL).
TTL is the field within a DNS record that specifies how for long the record is valid. It tells querying servers how soon they should check back in with the host of the record to see if the host has changed.
The TTL is often set to 12 or 24 hours, which is perfectly fine for regular DNS usage as server information changes infrequently.
Dynamic DNS works by creating a DNS record with a TTL setting of around 5 minutes. This tells the world that the address of the machine changes frequently and it is possible for it to serve as a host on the Internet.
With the DNS information being updated dynamically, the domain name you choose to point to your home network continues to be functional, regardless of what the IP address is at any given moment.
Here are the nuts and bolts of how this works technically.
Let’s assume you have set up dynamic DNS and are hosting a website on your home network using a domain name of mydomain.com.
If I were to type “mydomain.com” into my web browser, my device will ask my ISP’s name server how to resolve “mydomain.com”. The nameserver will then check its cache and if it finds no answer, start querying.
The nameserver will first ask one of the Internet’s 13 root servers. The root server will only know the rightmost part of the domain name so, in this case, the “.com” part. It will then refer the query to the specific DNS servers that can handle the “.com” queries.
The DNS server will tell the nameserver that the DNS information for mydomain.com is handled by nameserver.yourdnshost.com, but it still doesn’t have all of the information it needs, so the search continues.
Next, the name server will ask the same question again. This time nameserver.yourdnshost.com provides the information it needs: the specific IP address that mydomain.com resolves to.
It also provides the TTL information for that DNS record and that it should not be cached for more than 5 minutes.
My browser will then connect to the IP address and is able to see the website you are hosting.
This sounds like a long and drawn-out process, but in reality, the whole thing takes around a second.
If someone else sharing the same ISP as me wants to visit the same website within 5 minutes, they are able to use the information that has been cached by the ISP’s nameserver.
After the 5 minutes have passed, however, this data will expire and the querying process will need to be repeated.
This is because the next time the query is run, the IP address that mydomain.com resolves to may well have changed.
What Do You Need to Set up Dynamic DNS?
The process of setting up dynamic DNS for your home network is not only very simple but also free. Once you have it set up, you should need to do very little, if anything at all, to keep it maintained and working.
There are a few things you will require before setting up dynamic DNS, though. Let’s take a look at them.
-
A Dynamic DNS Host
The first thing you will need to set up dynamic DNS is a host.
There are several DNS host providers, so you certainly won’t be spoilt for choice.
A few of the more popular DDNS providers are Zonomi DNS Hosting, Dynu, and No-IP, but there are many others out there for you to choose from.
Regardless of the DDNS host you use, free or paid, you will receive the basic functionality of being able to resolve a memorable address to your home network’s IP address, but there are a few features those of you with greater requirements will want to keep an eye out for.
Some of you may wish to use your own domain name instead of one branded by the DDNS host. For example, you want myowndomainname.com to resolve to your home IP address instead of mydomainname.ddns.net.
Other features include the ability to use sub-domains; you could have separate addresses like music.myowndomainname.com and videos.myowndomainname.com that still resolve to your IP address.
Make sure to have a look at the feature list before settling on a DDNS host if you want more than just a basic name resolution.
For this tutorial, I’ll be using No-IP as my DDNS host as it is well established, widely used and offers the features I need, all for free.
The free option allows 3 hostnames, limited domains and you have to confirm your ownership every 30 days.
If you want 25+ hostnames, 80+ domain options and hosts that never expire, you may want to consider No-IP’s enhanced dynamic DNS service for a small yearly fee.
-
A Router That Supports Dynamic DNS
You’ll also want a router that supports dynamic DNS services. This is beneficial as when your router supports DDNS, all you need to do is enter your DDNS host’s information and the router will automatically update the address for you.
Providing your router is on, the DDNS entry will always be up to date and you will always be able to connect.
Bear in mind that your specific router may only support some of the basic DDNS services, so I would suggest you take a look within your router’s settings to see what it can offer before signing up with a specific DDNS provider.
This way you’ll know which of the features offered by the DDNS provider you will actually be able to make use of.
-
Or a Local Update Client
Should you not have a router that can support dynamic DNS, you will need to install a local client that will run on a computer that is frequently used on your home network.
The utility is lightweight and simply checks what your IP address is and then contacts your DDNS provider for it to update your DDNS record.
This is obviously less ideal than letting your router take care of all of this automatically, but it is better than having to manually edit your DDNS entry.
If you are using a local update client and the computer you install it on isn’t powered on when your IP address changes, the DDNS record will not get updated.
Remember this when you come to choose the computer to install on, but again, take advantage of the router instead if you have the option.
How to Setup Dynamic DNS
Now you know what dynamic DNS is and how it works, let’s take a look at how to actually set it up.
In this tutorial, we’ll be setting up a simple account with No-IP (the DDNS provider), point the address to my home network and also set up the automatic DDNS entry updating on the router as discussed above.
Remember that the No-IP web portal will be used, but the concept and setup process will be almost identical regardless of the provider you choose to use. If you need any help with your chosen provider specifically, consult their support.
1. Create and Configure an Account
First, you need to sign up for an account over at No-IP’s sign up page and confirm the registration of the account in the email you receive.
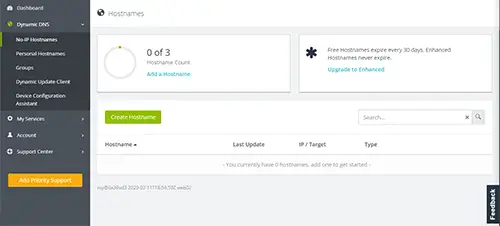
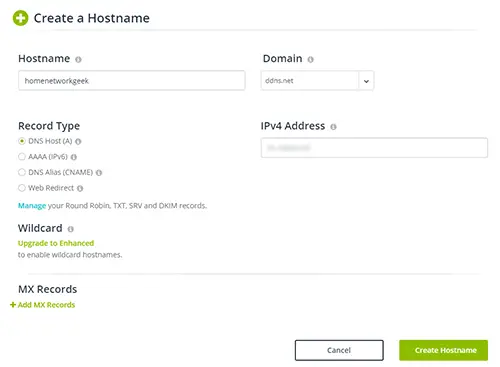
Once this has been done, you can log in to your No-IP account and go to the Dynamic DNS menu and select “Create Hostname”.
Enter the hostname you wish to use, the domain extension and the record type. The record type can remain as DNS Host (A) for what we are looking to achieve; pointing a hostname to an IP address.
Click on Create Hostname.
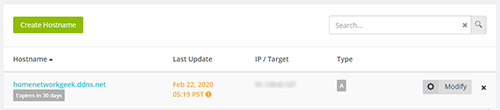
The hostname will now appear, showing the target IP address, when it was last updated, and when it is due to expire if you are on the free plan.
That’s all that is needed for a basic dynamic DNS redirection. We next need to look at setting up your home network to automatically update the DNS servers for you.
2. Configure Your Router
Half of the dynamic DNS setup is done. That was easy, wasn’t it?
Now it is time to automate everything by configuring your router to use dynamic DNS.
Remember that every router is different, but the settings will be pretty much the same across all routers that support DDNS. You should be able to find the specific menus just by having a look around, but if in doubt, consult your router’s manual or the online help.
First login to your router and go find the dynamic DNS menu. For me, this is under Advanced Settings and then Broadband.
You’ll see that it is currently disabled, so select to enable it.
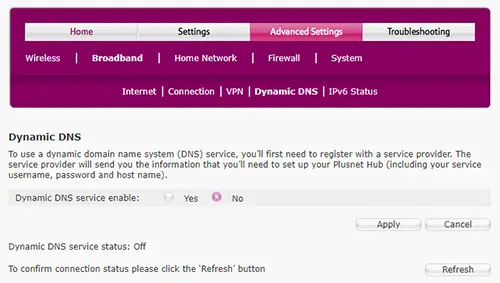
Your router will likely have a list of DDNS providers to select as the service. As you can see on my router, No-IP is available to choose from.
Enter your username and password you set up when creating your DDNS account and then enter the hostname you chose.
Click on Apply to save the changes.

If you click on the Refresh button, you will see a message to say that the dynamic DNS service is working as expected and the IP address is current.
![]()
Alternate Method
Updating using your router is a much-preferred option to using a PC-based updater, but you won’t have a choice if you don’t have a DDNS compatible router; the PC-based updater will be your only option for automating the update process.
To grab the update client, go to your No-IP dashboard and click on the Download button for the Dynamic Update Client for Windows.
![]()
Don’t worry if you aren’t using a Windows device as you still have the option to choose from Windows, Mac or Linux after clicking on the download button. Follow the installation instructions for your chosen operating system.
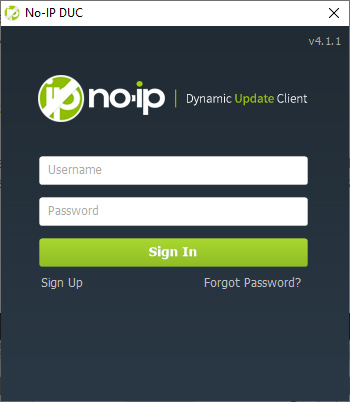
The installation takes just a few seconds; you will then be prompted to sign in to your No-IP account.
The below window will then pop-up. Tick the box and click on Save.
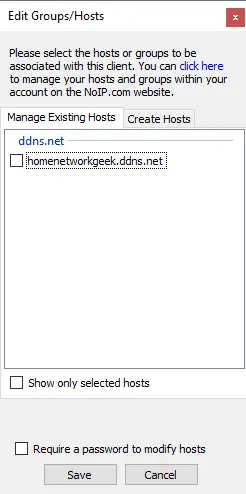
You should then see 3 green ticks to confirm everything is up and running. Providing the utility is kept running, you can more or less forget about it as it will automatically update your IP address.

Should you need any help with the setup or configuration of the service offered by No-IP, you can visit their knowledge base here.
Don’t Forget About Port Forwarding!
Congratulations, you have been able to set up a user-friendly domain name and direct it to your home network’s IP address. Just remember that this simply replaces your number-based IP address (that can be difficult to remember and change often) with a letter-based domain name that is easier to remember and doesn’t change.
You have not altered any of your home network settings.
Whatever did (or did not) work previous to setting up dynamic DNS will continue to work (or not work) even with the DDNS address in place.
Simply put, if you were to have previously connected to your Minecraft server whilst remote by visiting XXX.XXX.XXX.XXX:25565 (your home network’s IP address and port 25565), you can now use homenetworkgeek.ddns.net:25565 instead.
If you were previously unable to access your Minecraft server, even before setting up DDNS and instead using the IP address, you still won’t be able to.
The service was never configured to have an Internet-facing address that could be accessed remotely. To achieve this, you will need to set up port forwarding within your router’s settings.
Port forwarding allows you to access services applications, resources, and services that are situated on your home network from the outside world.
This applies to anything hosted on your home network. Let’s say you have a storage device that is attached to your router that you wish to access remotely using a DDNS address. Even with the DDNS address in place, you will still need to configure the service on your router to be accessible from outside of your home network first.
Final Thoughts
There are a few steps involved in order to set up dynamic DNS, but in reality, it’s not that much of a hassle and can be done relatively quickly.
A bit of upfront time investment brings the big reward of being able to access your home network from anywhere in the world.
Setting up dynamic DNS allows you to associate a memorable, user-friendly domain name with your home network’s IP address that is difficult to remember and changes frequently.
The result? Quick and convenient remote access to your home network.
