There are many different ways in which you can layout your home network. They will all work in similar ways, with just a few variations in what networking hardware is used and how each device will ultimately connect to the Internet.
In this article, we’ll take a look at 9 different home network layouts. Each will have a network diagram, an overview of the pros and cons, and some tips on how to set it all up.
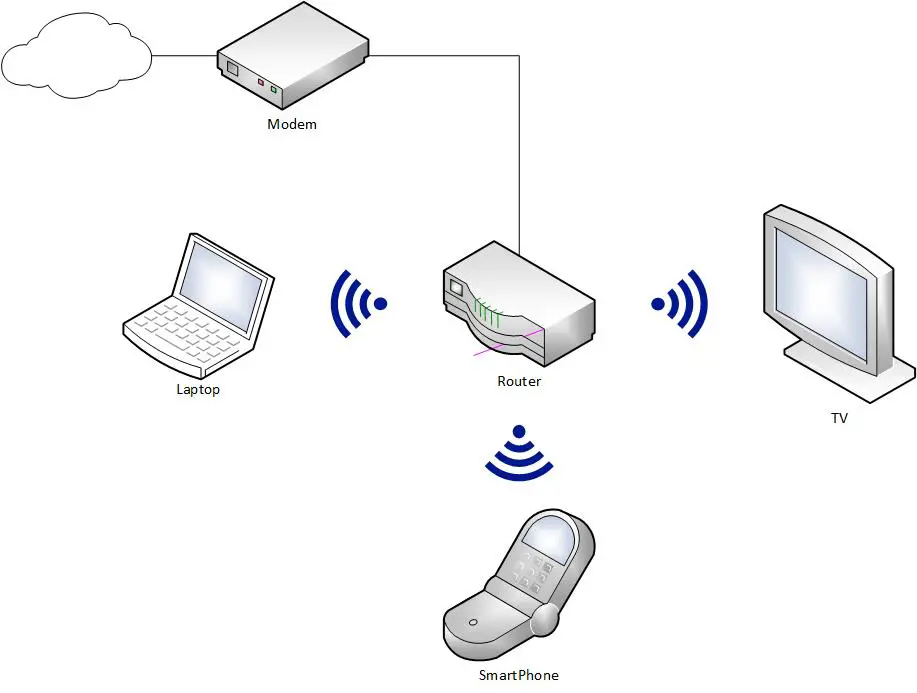
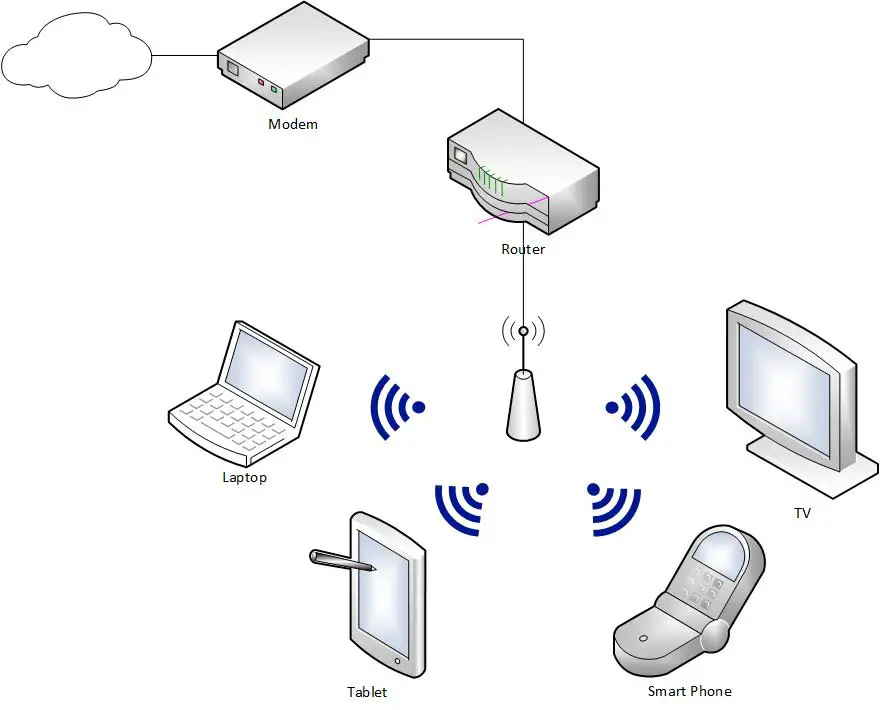
1. Wireless Network Layout
For a device to be able to communicate with a wireless router, it must contain a wireless network adapter. This could be built into the device itself as you would find with a laptop, or it could be external. A USB Wi-Fi adapter that would you plug into a desktop PC is an example of this.
The router that is used to connect to the modem also must have a built-in wireless adapter in order for it to share your Internet connection wirelessly. Without this, you will have to resort to connecting using physical cables.
Modern wireless routers will allow for a large number of devices to connect to it over Wi-Fi, so don’t be concerned that you have too many devices in this regard. The router will likely be able to handle the requests just fine.
Do keep in mind, though, that if many devices are attempting to use the wireless network at the same time, you should expect some decreased performance whilst the router handles multiple requests simultaneously. This is where a MU-MIMO-enabled router comes in particularly useful; they can handle multiple requests at the same time.
The vast majority of wireless routers will still allow you to connect some devices using an Ethernet cable thanks to several Ethernet ports being found on the back. There may come a time where you must first connect a device to your router using a cable in order to configure the wireless features of the router
Once this has been set up, you have the choice of whether to make use of the Ethernet ports.
That being said, using the Ethernet ports makes sense when the devices you are using lack Wi-Fi capability or are unable to receive a stable enough Wi-Fi signal from the router.
The limiting factor with this network layout is the range of the Wi-Fi signal the router can emit. The range of the router can vary drastically between manufacturers and even models by the same manufacturer.
External factors such as the materials used to build your home and other objects, like a microwave, causing interference can also impact the total coverage the router can provide.
If you’re looking for a Wi-Fi router that provides fantastic coverage, this one is my favorite.
2. Ethernet Network Layout
A standard router will come with a handful of built-in Ethernet ports, allowing you to connect a small number of devices to the router itself.
In order for a device to connect over Ethernet, it must have a working Ethernet network adapter. If it doesn’t have one built-in (a smartphone, for example) and there isn’t an external adapter available, you will have to resort to using Wi-Fi.
You will more than likely find another Ethernet port on the back of the router that is either labeled differently or is painted with a different color.
This port is often reserved for establishing a connection between the router and a modem, so plugging in a regular device, like a PC or games console, will not work.
The Ethernet ports found on the back of the router will simply not be enough for most people, especially if you are not using Wi-Fi. You may need to add in a network switch to expand the number of physical connections available to you.
In terms of Ethernet itself, it generally offers better performance than Wi-Fi and is much more stable in terms of connectivity. With Wi-Fi, there is always a chance that the signal rate can vary or even drop completely.
One thing to keep in mind if you have a large home and decide to use an Ethernet-only network layout is that a single run of Ethernet cable is designed to function at a maximum distance of 100 meters.
There are also different types of Ethernet cable which can limit the network speeds you can receive. The more recent Cat6 and Cat6a are able to deliver faster speeds at a maximum of 10 Gbps, Cat5e is able to deliver a maximum of 1 Gbps and Cat5 is limited to just 100 Mbps.
For most people, Cat5e will fit the bill.
Personally, I wouldn’t restrict yourself by using an Ethernet-only network. Wi-Fi is just too convenient.
In fact, I challenge you to even find a router that doesn’t use wireless; I would be surprised if they even exist these days!

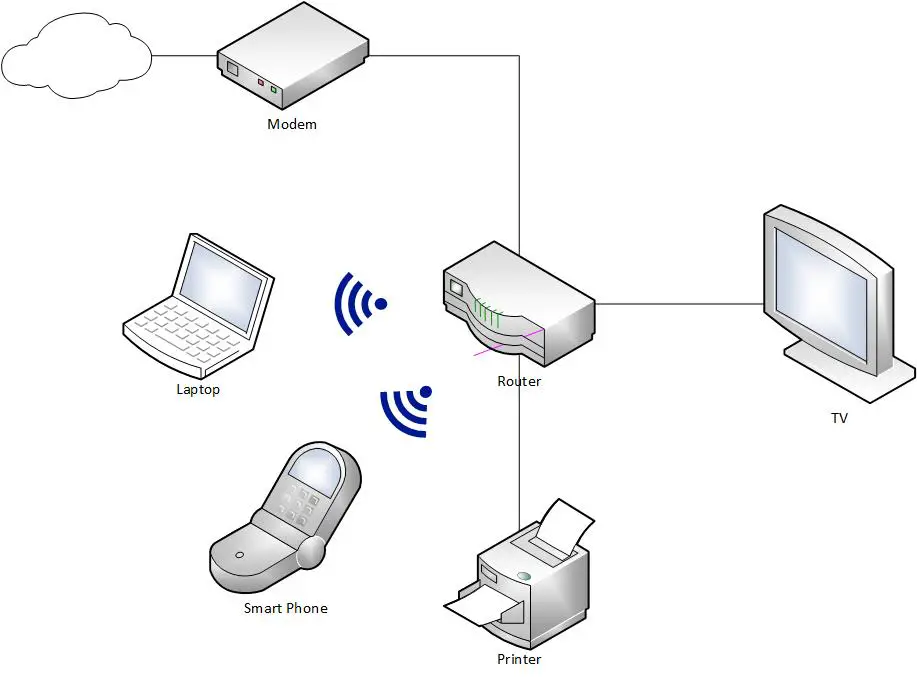
3. Mixed Wireless and Ethernet Network Layout
Probably the most commonly found network layout is a hybrid of both wireless and Ethernet connections.
Given that almost all routers these days will come with Wi-Fi capability built-in along with four physical Ethernet ports, you can easily make use of both.
The wireless component will allow you to connect many different devices across your home, whilst the Ethernet ports can be reserved for those devices that need it, like a smart hub, or your most-used devices where you want the best possible connection.
The same limitations that come with both Ethernet-only and wireless-only networks apply here.
The router must be placed in a suitable location within your home to provide the best possible coverage, and you may need to invest in a network switch if you find the router doesn’t have enough Ethernet ports to meet your needs.
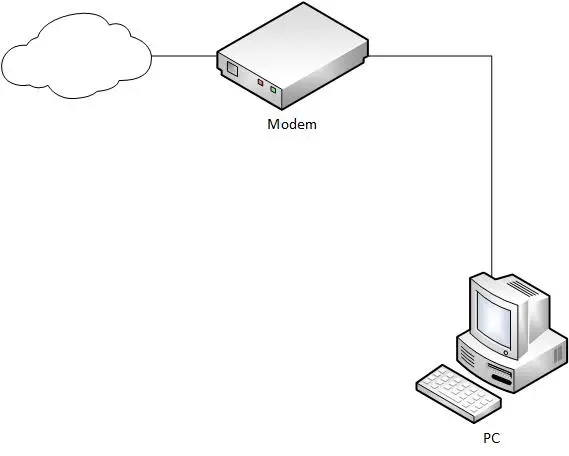
4. Direct to Modem Network Layout
If you don’t possess a router, it is possible for a single device with a working Ethernet adapter to access the Internet by plugging it directly into your modem.
When your device is connected directly to your modem, it is in turn connected directly to your Internet Service Provider (ISP) and from there, the Internet.
Connectivity-wise, there is nothing wrong with this setup; you will be able to browse the Internet as if you were connected via the router.
It is certainly not the recommended network layout to adopt, though.
The huge drawback of this network layout is the massive lack of security.
When your device is connected directly to your modem, it will be completely exposed to the Internet.
The IP address that is assigned to your modem, known as your public IP address, will resolve directly to your computer.
This means that any vulnerabilities on your device, be it a bug in the operating system or a port being left open, are potentially accessible to anyone that knows your public IP address.
The chances of anyone being able to find your public IP address are relatively low, however, it is certainly not a chance I would be willing to take.
When your device is connected directly to your modem, you are relying 100% on the device itself for any protection whatsoever. This could be protection built into the operating system itself or a separate piece of firewall software.
Both of these have been found to be pretty ineffective as protection against cybercriminals.
My advice would be to forget that this type of network layout even exist; don’t risk it and make sure to include a router as part of your network.
Not only will the router provide many more devices with a connection at the same time, but the firewall supporting it is much more capable and disassociates your individual devices with your public IP address.
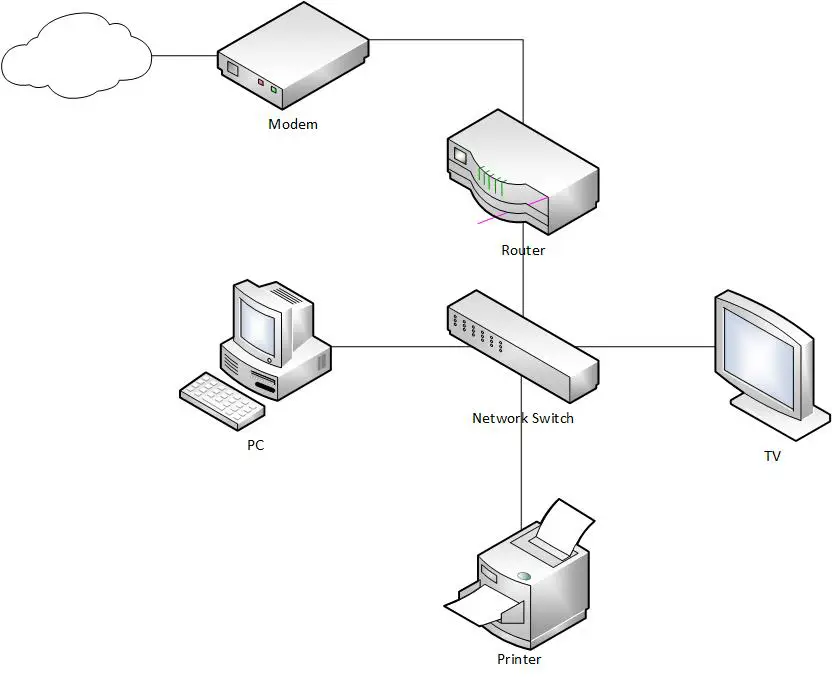
5. Ethernet Switch Network Layout
Incorporating an Ethernet switch into your home network expands the number of Ethernet ports available for you to plug your devices into.
This will generally offer better performance compared with Wi-Fi in addition to you not having to worry about the potentially varying Wi-Fi signal.
Switches can be managed or unmanaged, both of which provide different features and configuration options. They will often vary quite a bit in price, too. A managed switch will cost you considerably more than an unmanaged switch.
Smart switches sit somewhere in between the two in terms of both capabilities and cost; they are the type of switch I would recommend for a home network as they provide the more useful features that would be found in a managed switch but without the hefty price tag.
Realistically, you would keep your network switch powered on 24/7 for convenience and quick and easy access to the Internet on your devices, but this can concern people as to how much power they consume and how much it will cost them to run.
Ethernet switches don’t actually use much power; you can expect a typical switch to use between 15 and 30 watts which equates to very little in the grand scheme of your total energy bills.
Despite all of them providing the same basic functionality of increasing the number of Ethernet ports at your disposal, some will be designed in a particular way to suit certain needs.
For example, you could have a network switch designed with gamers in mind that offers next to no latency, or a switch that uses PoE to provide both power and network connectivity to IP-based cameras.
One of my favorite network switches is the NETGEAR Nighthawk S8000. In addition to it being a smart switch, offering next to no latency and having a good number of available ports, it looks really cool.
6. Wireless Access Point Network Layout
A regular wireless router will prove a wide enough coverage and a suitable number of connections for most people, but you may find a wireless access point is needed if you have a particularly large home or lots of devices to connect wirelessly.
They can come in very handy if you receive a weak Wi-Fi signal in some areas of your home, or even dead spots; areas where the signal is non-existent.
A wireless access point (WAP) works by connecting to your router via an Ethernet cable; this provides it with the Internet connection and bandwidth it needs to function.
It will then transmit and receive a wireless signal on either the 2.4 GHz or 5 GHz frequency bands.
The WAP will then allow you to connect devices wirelessly to your local area network where it may have previously not been possible.
There are several benefits that come with using a wireless access point including the ability to place them pretty much anywhere if they are PoE enabled, additional features such as being able to manage devices connected to your Wi-Fi network and supporting a captive portal and access control lists, and the option to cluster them so changes can be made to several access points at once.
Some wireless access points can even be installed outside to extend your Wi-Fi coverage out to your backyard. Here are some of my favorites.
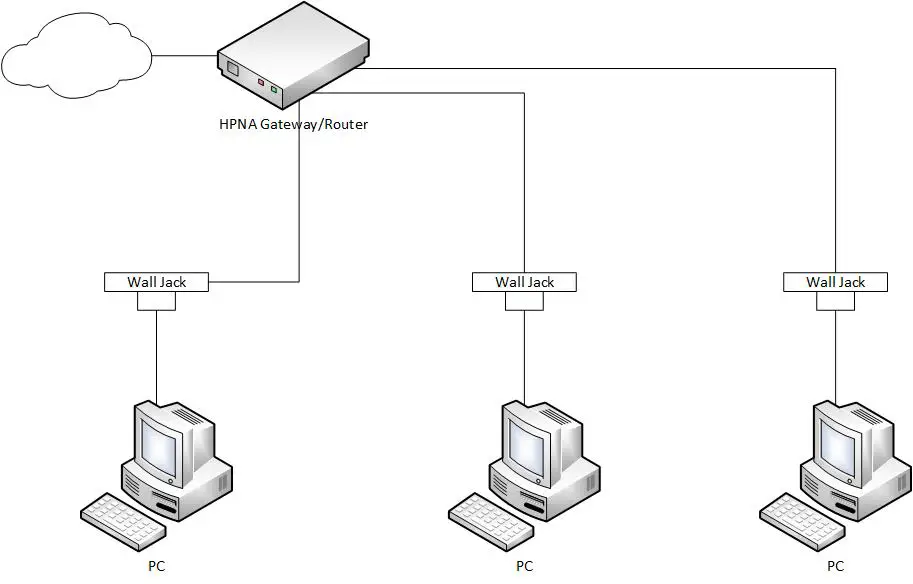
7. Phoneline Networking Layout
Although not used very much at all nowadays, phoneline networking was cheap, easy to install and fast. The fact that it didn’t require any additional wiring was also a bonus.
HomePNA makes use of the already existing telephone wiring in your home.
Phoneline networking is more commonly referred to as HomePNA as it is based on the specifications laid out by the Home Phone Networking Alliance (HPNA). The HPNA is a collection of networking technology companies that come together to create a phone line based standard for networking.
The first iteration of HPNA operated at just 1 Mbps, but the most up to date specification, HPNA 3.0, operates at 128 Mbps.
Some of the advantages of using HomePNA include:
- The use of the phone doesn’t affect network speed
- Support for up to 50 devices
- Fast enough for applications that use a lot of bandwidth, like video
- Compatible with many operating systems including Windows, Mac, and Linux
- Easy and inexpensive to install
- No additional networking equipment needed
The big drawback to HomePNA is that it requires a phone jack close to each device, otherwise you would need to run phone extension cords or even go through the hassle of installing new wiring.
There is also a physical limit of 1,000 feet (304.8m) of wiring between devices, and the total area of coverage should not exceed 10,000 square feet (929 m²).
Although rare, it has been found that HomePNA simply will not work on the existing telephone wiring. Plus, there have been some reports of distorted phone calls in homes where HomePNA is being used.
The equipment needed for phoneline networking to work is not only very difficult to find these days, but the fact that almost every device is compatible with Wi-Fi has made this type of network layout pretty much redundant.
The chances of walking into a home and finding a HomePNA network setup are incredibly rare; there are simply other technologies that are more capable, more easily accessible, and cheaper than this traditional setup.
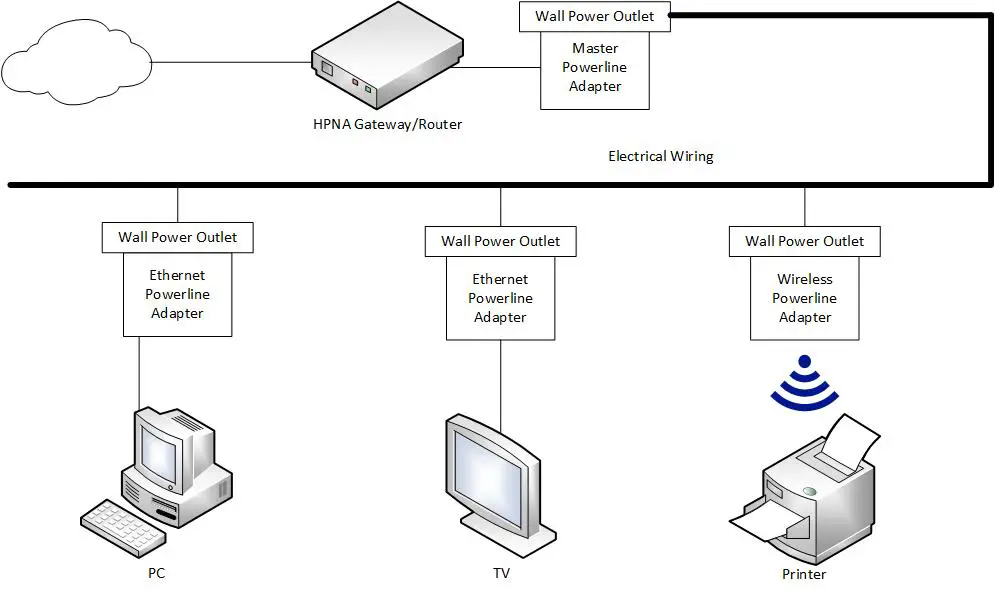
8. Powerline Networking Layout
Powerline networking makes use of the regular electrical wiring found within your home to carry network communications. Routers, bridges and other adapters can all utilize powerline technology.
Using a powerline adapter couldn’t be easier. Simply plug the adapter into a standard wall outlet and then plug your device into the adapter itself, usually via Ethernet or USB.
The device connected to the powerline adapter will get its network connectivity from the electrical wiring within the wall.
Several questions often get asked when it comes to powerline networking.
The first is whether they use a lot of electricity given that they will typically remain powered on all of the time.
Powerline adapters use very little electricity, making them a cheap and convenient way of receiving a network connection. Based on the research I have done into various powerline adapters, I found that they can use as little as 2W of electricity.
Compare this with other devices in your home, such as a TV or games console that use several hundred watts of electricity and you’ll soon see that powerline adapters are nothing worth worrying about in terms of energy costs.
Some people may ask whether powerline adapters need to be on the same electrical circuit to work.
The conclusion I came to based on some research is that powerline adapters will typically work across different circuits (upstairs and downstairs in a home, for example) but you may well experience a performance drop.
Wall outlets are often in high demand, so what if you don’t have one available for your powerline adapter? Can you use an extension lead?
Powerline adapters should work when plugged into an extension lead, but manufacturers typically advise against it as they can cause a significant drop in performance and some may even block the signal altogether.
My advice would be to plug your powerline adapter directly into a wall outlet wherever possible.
Finally, some people have asked how many powerline adapters can be used within a single network.
There isn’t a limit as such to the number that can be used, however, you will be limited by the number of wall outlets available and your total available bandwidth. If you have less bandwidth available, you may want to limit the number of adapters you use to ensure the best performance.
Even though powerline networking provides a cheap and convenient way of getting the benefits of a wired Ethernet connection without having to run new cables, there are some limitations to using it.
It does remain much less popular compared with using Wi-Fi or Ethernet which results in fewer choices when it comes to buying an adapter.
Also, the maximum speeds available when using powerline networking are considerably less than Ethernet and Wi-Fi, and poor quality electrical wiring usually found in older homes can impact the performance of using a powerline network.
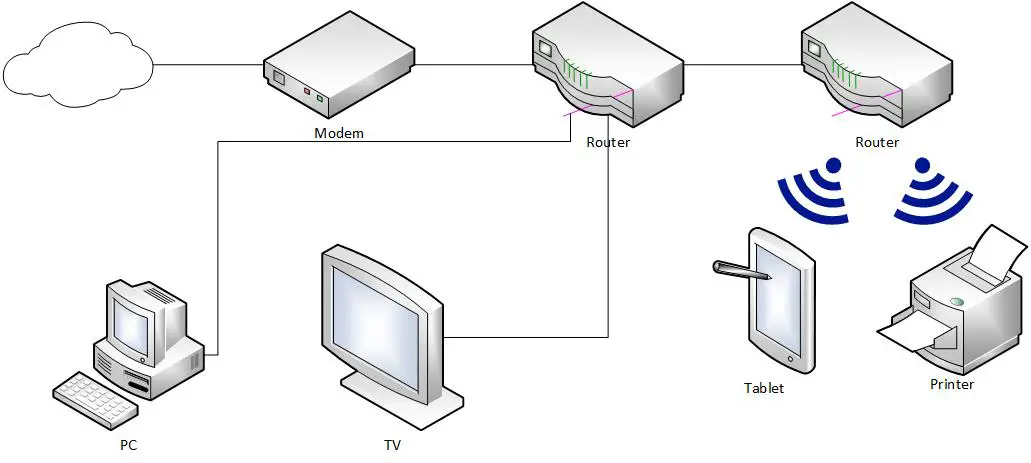
9. Two Router Network Layout
Your typical home network layout will only involve one router, but adding a second into the mix gives you more options for both expanding and managing your home network.
Not only can a second router provide better wired and wireless coverage across your home, but it can also help improve overall performance.
Here are some of the key benefits you can receive from having two routers connected to your home network:
- More connectivity for wired devices: It is likely that your primary router only has a limited number of LAN ports available to connect wired devices to it (four or five if you are lucky). Adding a second router immediately provides additional Ethernet ports that provide more devices with wired connectivity without the need for a switch.
- Better support for mixed wired/wireless setups: Having a second router is useful if you have a wired home network but also want to connect some Wi-Fi enabled devices. The routers can be separated in the sense that the wired devices will continue to connect to the primary router, whereas all of the wireless devices would connect to the secondary. This is particularly helpful if the wired devices are positioned at the other end of the home to the wireless devices.
- Isolation for certain devices: If certain devices in your home utilize the network connection particularly heavily, two routers can be set up to isolate certain devices and prevent a large amount of network traffic affecting the other devices. As an example, you may want to look at isolating a particular PC that frequently transfers large files or plays a lot of online games from a smart TV that is streaming video.
- Improved wireless coverage: A second router can simply be used to extend an existing Wi-Fi connection, greatly improving the coverage in your home and providing even those far away devices with a stable wireless connection.
- Backup device: It doesn’t hurt having a working backup router available in case one suddenly fails.
There are two different connection types to choose from when setting up a second router: LAN-to-LAN or LAN-to-WAN.
LAN-to-LAN extends your existing network connection and SSID (Service Set Identifier) to include the second router. This configuration will allow you to share files between devices regardless of which router they are connected to.
LAN-to-WAN works differently in that it creates a second network within your main networking, allowing you to place restrictions on any devices that connect to it. This is a good idea if you wish to isolate certain devices on your network, but it won’t support the sharing of files across two separate networks.
I have provided an in-depth tutorial on how to set up a second router but if you are looking for an alternative, you could also look at investing in a network switch instead of a router, or a wireless access point if you want to make more use of Wi-Fi over Ethernet.
Final Thoughts
Here is a quick recap of the 9 different network layouts we discussed:
- Wireless: Relies solely on Wi-Fi
- Ethernet: Relies solely on Ethernet
- Mixed Wireless and Ethernet: Makes use of both Wi-Fi and Ethernet connectivity
- Direct to Modem: Provides a single device with a connection, but is not recommended
- Ethernet switch: Increases the number of Ethernet connections available
- Wireless Access Point: Improves the coverage of the Wi-Fi signal
- Phoneline Networking: Makes use of the existing telephone line wiring
- Powerline Networking: Makes use of the existing electrical wiring
- Two Router: Improves both wired and wireless coverage
My personal home network makes use of both Wi-Fi and Ethernet. Wherever possible, I have provided my most used devices like my gaming PC and my TV with an Ethernet connection to provide them with the best possible performance, whilst reserving the Wi-Fi connection for the devices that cannot make use of Ethernet, like my smartphone.
I also have a network switch to increase the number of Ethernet connections available to me rather than having to rely on the few found on the back of my router.
I hope you found this article on the different possible home network layouts helpful and now have a better idea of which may be most beneficial to you.